The X-ray micro CT and nano CT research LAB of Materials Characterization and Advanced Coatings research group is a part of the Advanced Nanotechnologies and Microtechnologies research program in the Central European Institute of Technology (CEITEC) at Brno University of Technology.
Research areas
- Development and application of micro and nano- radiography and computed tomography (μCT, nano CT) techniques in different fields,
- High-resolution 3D metrology,
- Combination of micro- and nanoradiography and μCT, nanoCT techniques with other analytical approaches, e.g. with Laser-Induced Breakdown Spectroscopy (LIBS) for high-resolution elemental mapping.
History of the lab
The basic impulse to investigate and apply µCT and related techniques came from the need to identify non-destructively a proper cross-section for elemental mapping in various samples preferably by LIBS. Laboratory of Laser Spectroscopy has more than 15 years of experience with the development of LIBS methods and disposes of all necessary devices for the implementation of general single-pulse LIBS and also its variations: double-pulse LIBS (with increased detection limits), LIBS + LIFS (Laser Induced Fluorescence Spectroscopy), LIBS of liquids and remote techniques: remote LIBS (by optical fibre) and stand-off LIBS (via air). Going back do X-rays, the development of µCT techniques in the research group started in 2005 with the co-operation with synchrotron Elettra, Trieste Italy.
Main fields of cooperation:
- X-ray microradiography and micro CT (µCT),
- Development of advanced techniques (dual-energy µCT, phase-contrast µCT),
- Applications in various fields.
This cooperation resulted in 7 common papers, 2 common articles in „Elettra Highlights“ and a number of common conference proceedings/abstracts.
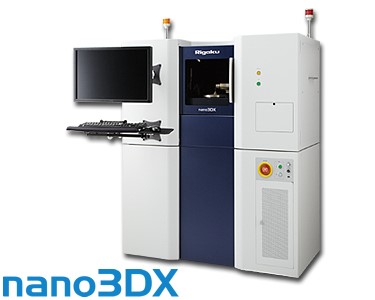
Based on this ongoing co-operation and also research projects realized at other synchrotrons in Europe, a foundation of the new laboratory was decided in the frame of CEITEC´s structure. The µCT lab equipped with state of the art µCT stations GE v|tome|x L 240 and Rigaku nano3DX (available from October, 2014) is in full operation since September, 2012.
The key equipment
GE v|tome|x L 240
- Maximum sample size – Φ500 x 800 mm,(i.e. size of the circumscribing cylinder),
- Maximum weight of the sample 50 kg,
- Achievable voxel resolution < 2 µm for 240kV microfocus X-ray tube and ~ 1 µm for 180 kV nanofocus X-ray tube.
System
- Granite-based, 7-axes precision manipulation system,
- Longlife, open, micro- (240 kV / 320 W) and nanofocus (180 kV / 15 W), X-ray tubes,
- Large active area (410 x 410 mm) 2048 x 2048 pixels (200 µm pixel pitch) GE DXR250 flat panel detector with a dynamic range 10,000 : 1,
- Built-in computer cluster and software packages for fast, high-quality CT reconstruction.
Data analysis
- 3D visualization software Volume Graphics Studio Max 2.2,
- Metrology package with:
- Coordinate measurement module,
- Nominal/actual comparison module,
- Wall thickness analysis module,
- Advanced Porosity / inclusion analysis module.
Rigaku nano3DX (available from October 2014)
- Tube voltage: 20 to 50 kV
- Tube current: up to 30 mA
- Target: Cr or Cu
- Detector: X-ray CCD camera
- Number of pixels: 3300 × 2500
- Pixel size: 0.27 μm or 2.2 μm
- Field of view: 0.9 × 0.7 mm or 7.2 × 5.4 mm
- Dynamic range: 16 bit
- Sample stage: automatic 5-axis stage
- Stage rotation axis accuracy: <0.5 μm
Data analysis
- 3D image quantitative analysis software nano3DCalc
- 2D and 3D picture displaying, trimming, filter, binarization, labeling, logical calculation
- quantitative measurement (Volume, surface area, position of gravity center and direction)
- 3D image displaying software INTAGE Realia Professional
GE phoenix v|tome|x M
- Maximum sample size: Φ360 mm x 600 mm (i.e. size of the circumscribing cylinder),
- Maximum weight of the sample 50 kg,
- Achievable voxel resolution 1 µm
- Planned modernisation for the metrology edition with a measurement accuracy of 4+L/100 µm referring to VDI 2630 guideline.
System:
- Granite-based, 5-axes precision manipulation system
- Longlife, open, microfocus X-ray tube 300kV/500W
- GE DXR250 flat panel detector
Application fields (ongoing cooperation)
Mechanical-, Material-, Electrical- and Civil Engineering (Development, Trouble shooting & Reverse Engineering, Quality and inner/outer shape control of components from plastics, ceramics, light metal castings, wood, etc.
- food industry (e.g. counting the number of bone fragments in meat products), medicine (e.g. study of bones or implants), archaeology,
- forensic sciences and legal engineering, criminology, etc.
i.e. in a wide range of applications focused on non-destructive investigation of the inner/outer structure (both materials & dimensions).
Research group SITE
Contact person
Tomáš Zikmund, Ph.D.
| Phone: | +420 54114 2846, +420 776 563 396 |
|---|---|
| Mobile: | +420 776 563 396 |
| E-mail: | , |
| Office: |


